

Gong&Que
While I was playing Cyberpunk 2077, despite the gameplay part, I found lots of interesting-looking structures combining both futuristic and traditional elements. In the newly released total war Warhammer III, there is this faction called Grand Cathay, the environment refers to the ancient Sino architectural complex as well. I was thinking can I build a modular game environment that conveys both exotic traditional and futuristic sci-fi feeling? So I started to do some research first about ancient building techniques, construction materials, and wall pattern design.

Reference images

I chose the Qin dynasty’s building as the standard, mostly because of Qin dynasty laid fund stone of not only architecture but also every front of these old agricultural civilizations.

To Make sure the model is mostly historically accurate, for example, I studied this small bracket structure that was used for weight distribution, made pillars 40 centimeters in diameter, and beams 32 centimeters in width and height, all fit on the same scale as their real-world counterpart, I also went to the forbidden palace and scanned a pattern book which I used to make textures later.

Then I get a bunch of ugly-looking low polys, normally we would make high-res models and bake normal map, turn left into right, get that nice highlight, and transition between bright and dark faces, but, architecture parts have mostly flat surfaces and do not really require a specific normal just on edges, I was thinking is there a way to jump over the part of making high-res model and baking normal, getting game-ready mesh immediately after making low-res?
I got an idea from a shader in V-ray renderer, in max, you can get a good result without worrying too much about topology,


so I developed a solution in substance designer, it requires a low-res model with a consistent smoothing group and the same model with a customized smoothing group.


Final result of autobevel tool
After the previous experiment, I created a bunch of game-ready models without making high-res models and baking, I started to worry about texturing, both traditional and sci-fi models have lots of details, it is unlikely to customize each single of them

Also, to keep workflow procedural, I adopt trim sheet technique. So I made two sets of trim sheets, by aligning the UV, I can easily texture the whole mesh in a very short time, take these two parts, for example, I can quickly make many variants and test new designs by creating a new shape and maneuvering UV.


I was having big trouble stitching modular mesh parts even though I have all the pivots set correctly because sometimes I drag the wrong vertex near pivots and cause some parts off the grid, I was thinking about making a blueprint that calculates the distance or arrangement for me, so, I developed this tool to help me quickly construct various palace buildings inside unreal without snapping pieces together as I did in 3dsmax earlier.


Click to play

I realized only building an old palace does not make the environment look ancient nor sci-fi, then I decided to dig more on the art side, here are progress I was concepting and compositing the scene.

Compared with the render I did In 3dsmax, the Image rendered in unreal seems too washed off.
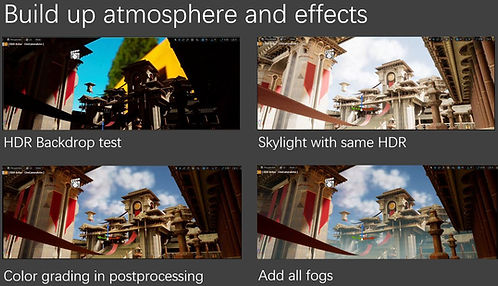
I tested with an HDR backdrop, but it overwrites the sky sphere, In order to get colors back but not that strong, I used the same HDR map in Skylight to get overall GI, and did color grading in postprocessing, got fogs in at the last, I also replaced default sky sphere with sky atmosphere and volumetric cloud to get a better-looking background. Soon I realized, that only using an overall exponential fog is not enough, so I add some cascade particle fog sheets to enhance the middle ground atmosphere in both scenes.


Taking advantage of Lumen in Unreal 5, I used some console commands to bring the visual to a higher level such as lighting and reflection quality, take this for example, by increasing samples per ray, you get shadow with better quality.
set all alpha textures compression settings to Alpha, and all roughness and metallic to greyscale, set HDR map to HDR and all other textures on DXT1


Final Renders


Click to Maximize


